Wednesday, December 21, 2016

ALTERED BOOK


     This is my 'Altered Book'.  I designed it to be used as a coffee table centerpiece.  Fairies in a garden setting is my theme.  It measures 6" tall x 8.5" wide and 11.5" long.  


                                     I started with an old book from the local Thrift store.


     The page folding technique came from a video by  'Owlhouse Designs'.  You can find that HERE.  I burnished the folded pages with 'Gathered Twigs' Distressed Ink by Tim Holtz.


     My next step was to make a bow out of 2" ribbon and hot glue it to pages.  Also attaching a plastic butterfly from my stash.


      Close up of right hand corner of book.  Paper stepping stones lead up to this 3" plastic door surrounded by tufts of small plants.  The plants are made using 'Tiny Tattered Florals' die by Tim Holtz.


              Side view.  Fairies are fancy cut from 'Enchanted Forest' papers by Graphic 45 Designs.


      Close up of flowers.  I used 'Tattered Florals' die by Tim Holtz for the large 2" roses.  The smaller roses are made with EK's five petaled 1" punch.


       I love to share how I make my projects and see what others are doing as well.  So please leave me a comment.   Thanks for stopping by...


Thursday, December 8, 2016

WATERFALL FOLIO


This is the front cover of my 'Waterfall Folio'.
It measures 4 1/2" x 8 1/2" with a 1" spine.
I followed directions in a video by Ginger at 'My Sister's Scrapper'.  HERE is a link.


The bear is two sided and is sitting up in a patch of flowers and grass.


This is the inside.  Blank card stock on the left is for recipes.


Recipe cards are scored in the middle to fit inside 'Waterfall'.


Here's the back cover.


Thanks for stopping by...

Monday, October 31, 2016

MINI 'FOREVER GARDEN'


     This 'Forever Garden' is a smaller version of the one I posted on October 10, 2016.   The flowers are mounted on a 4"x 4" block of wood and measure about 12" high.  All directions are the same.


                                                               This is the back. 


                 For the white stamen I used a die from Memory Box called 'Chandra Stem'. 


     The grass effect is a combination of  two dies:  The tall grass is from Impression Obsession  die #DIE038-J and the other is 'Tiny Tattered Florals' by Sizzix.


                                                             Thanks for stopping by...

Friday, October 21, 2016

TWIST-n-POP CARDS


     This is my Twist-n-Pop card. It measures 4'' wide by 6'' tall.  The body of the card is made from a 12x12 piece of cardstock.  
     There is a wonderful video by Collette Mitrega that shows you step by step how to make this.  You can view that video HERE.


     I chose a digital kit by Snickerdoodle Designs called 'Harvest Sunset' for all the backgrounds and elements to design the panels.  You can get that kit at Digital Scrapbooking Studio HERE.  I made my templates based on the measurements from the video.  After cutting everything out I burnished all the edges with Wild Honey Distress Ink by Tim Holtz.


                                  This is the inside of the card as it opens and 'POPS' out! 


                                             Here's a close up of the four center panels.


     This is a 'Get Well'  card made exactly the same way as the one above.  Again I chose to use a Snickerdoodle Designs digital kit for my papers.  However this kit is 'retired'.  It is called 'Beeatrice'.
     The card measures 4'' wide by 6'' tall and is pictured with the belly band that helps to keep it closed.


                                                 Front of card without belly band.


                                              This is the card as it opens and 'Pops Out'.


                                              Here's a close up of the four center panels.


                                                            Thanks for stopping by...

Monday, October 10, 2016

FOREVER GARDEN


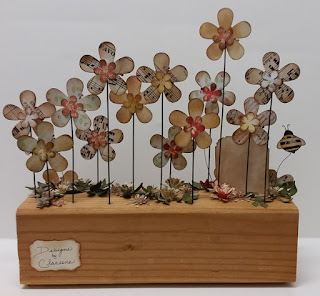
     This is my 'Forever Garden'.  A perfect combination of two of my most favorite things:  Wood and Paper!
     The base measures  4''x4''x11 1/2'' .  The flowers have varying lengths but over all piece measures 11 1/2'' x 12''.


     This close up photo shows the clustering of flowers and leaves.  The leaves are a Sizzix die called 'Garden Greens' by Tim Holtz.  The word art reads:  I want to be like a sunflower, so that even on the darkest days I will stand tall & find the sunlight.
     I added a few paper bees on wires from my stash.


     I choose two different digital kits for my papers.  For the front of the flowers I used 'You Are My Sunshine' by Snickerdoodle Designs.  You can get that kit HERE.  The backside is from 'Vintage Music'.  Also a Snickerdoodle kit.  You can get that kit HERE.
     I printed the backgrounds onto 8 1/2''x11'' Avery shipping labels.  Then mounted them on cereal box cardboard.  NOTE:  Adhere label sheets to shiny side of box.  That makes it easier to glue two sides of flowers together.


     I cut the flowers using a five petal 2 1/2'' punch from 'ek'.  All the edges were burnished with Distress Ink 'gathered twigs'.  Straight lengths of wire were cut into various sizes for the stems.
     I used Glossy Accents to adhere flowers together.


     I attached stems with hot glue on the backside of flowers.  Then covered the top of the wires with smaller flowers made with a five petal 1 1/4'' punch also by 'ek'.  Again burnishing all the edges.


     This is a close up of one of the flowers.  The centers are made by layering the different punches.  I used hot glue.
     The smaller photo here is a close up of the very center of the flowers.  They are made with a die from Sizzix called 'Tiny Tattered Florals' by Tim Holtz.  


     Drill holes into base and start inserting flowers.  Before gluing in place make sure of the  length and then start decorating with 'Tiny Tattered Florals' and flowers without stems.


                                                             This is a shot of the back.


                                                              Thanks for stopping by!


Friday, August 12, 2016

BRAG BOOK-MINI ALBUM


     This Brag Book Mini Album measures 4 1/2" by 5 1/2".  It's the perfect sized album if you like to use digital kits and print your own pages.  The largest paper is 9 1/2".  
      I chose 'My Little Chickadee' digital kit from Snickerdoodle Designs because of the dots and stripes backgrounds.  Also, the word art was perfect for my 'Baby Book Theme'.  You can find that kit HERE.
      I chose 'Good Friends' digital kit because I loved all the pastel backgrounds.  You can find that kit HERE.  


      I used the Mini Album Tutorial by Marla on You Tube to construct the basic album.  You can find that site HERE.  


      I printed one side of the papers on 'Whisper White' paper from Stampin' Up.


      Then printed the other side of the papers with the dots and stripes from 'My Little Chickadee' kit.


      I trimmed off the white border from all the papers.  Then followed Marla's instructions on cutting the front cover, inside cover, pages and the photo-mats.


      I used 'Tea Dye' distressed ink by Ranger for burnishing all the edges.


      I gave the edges of the middle tags a tattered look before burnishing the edges.


      Here's a close up of how that looked.  


      Here's a close up of the front cover.  The butterflies were made with a Stampin' Up punch.  For the flowers I used Sizzix thinlits die 'Tiny Tattered Flowers' by Tim Holtz.


      These are the finished two front pages as you open the album.


      I used the word art from 'My Little Chickadee' kit.  I changed the look by adding color and using 'effects' in Photo Shop Elements.


      This is a pic of two of the finished pages inside the album.


      Two more of the finished pages on the inside of album.


                                                             Thanks for stopping by...


Sunday, July 17, 2016

ROSETTE FLOWER PICKS


     I started out to make little paper rosette flowers for cards or accents on different projects.  Glori Winders has a wonderful tutorial showing how to make them.  You can find it HERE.
     Then I thought I'd try layering them with the different sizes.  These Rosette Flower Picks all measure about five inches.  


     Then they were too big for cards.  So I mounted them on wooden skewers.


      I used different papers from Graphic 45 collections.  For the butterflies on this pick I used a Martha Stewart punch.


     The music notes on the yellow paper are made with a strip of decorative tape by Tim Holtz.  I added that on before scoring the rosette.
     The bees are cut out characters from the internet.  I size them in photoshop, reverse the image, cut them out and glue them together.  They are mounted on 16 gauge wire.  See earlier posts on my blog for more details.


     These butterflies are made using the same Martha Stewart punch.  The center is a glass bead that is flat on one side.  The white doily is a simple store bought paper doily.


     The doily on this pick is a Thinlits die from Sizzix by Tim Holtz.  The center is decorated with a cluster of tiny flowers made with the Tiny Tattered Florals Thinlits die from Sizzix by Tim Holtz.


     And here's the Rosette Flower Picks in action.  I put a couple in a flower arrangement on my dining table.  


                                                         Thanks for stopping by...