Monday, November 15, 2021

FLORAL BOX


I created this 'Floral Box'  using  white cardstock.  Background papers are from a digital kit of polka dots from my stash.  The flowers are attached to a handle that is attached to the removable lid.  Box measures 4" x  4". 


This is a close up of a very mischievous cat hiding among the flowers.  Cat is from clip art on the internet.


Here is the back.  The flowers and bees are also from clip art.  I brought them into Photoshop for coloring and sizing. 


...and there you have it.  Thanks for stopping by...


Sunday, November 7, 2021

CELEBRATE!


        This a 'Celebrate!' center piece that I created for the New Year.  It stands 11" high and the base is  2" x  4".   The polka dotted background bottle is made of cardstock as are the other pieces.   I put a block of styrofoam in the bottom  of the box to hold the ephemera pieces.  They are attached to heavy wires. 


This is one side.


This is the back.  As you can see I wanted a full 360 degree center piece.


This is the second side.  


...and there you have it.  Thanks for stopping by...


Tuesday, September 14, 2021

HALLOWEEN MILK CARTON TREAT BOX


I created this 'Halloween Milk Carton Treat Box' based on a great little tutorial by Sherry at 'The Posh Paper Lady'.  You can find that tutorial HERE.  The carton measures 1 1/2'' wide and 6'' tall.  I used 65 lb. weight cardstock.


All four sides are decorated for Halloween.  The patterned papers are from my digital stash. 


The ephemera is from clip art on the net.  I brought them into Photoshop Elements for sizing and coloring.  Some are mounted with dimensionals.  Others are glued on.


Here's the backside. 


...and there you have it.  Thanks for stopping by...


ROSETTE CHRISTMAS TREE


        Another 'Rosette Christmas Tree'.  This one was created the same way as previous tree except that I added extra layers, 14 in all, and the bottom row measures 8''.  The tree is setting on what is the bottom of a bird cage.  


                                      ....and there you have it.  Thanks for stopping by....


Wednesday, September 1, 2021

ROSETTE PAPER PUMPKINS


                                Here are the steps I used to create this 'Rosette Paper Pumpkin' 

The instructions were supplied by a Stampin Up Rep named Cindee.

Take a  9'' x  12''  piece of cardsotck and score the whole sheet every 1/4'', then cut into the strips.

2 - 1''  x  12''

2 - 1 1/4''  x  12''

4 - 1 1/2''  x  12''

I used a 1'' circle punch on both sides of the 1'' strip to form the rosette.  


Here's a close up of the top.  Leaves were cut from a pattern in my Scan-n-Cut.  Ribbon bow tops it all off.


                                            ...and there you have it.  Thanks for stopping by...


Thursday, August 12, 2021

ROSETTE CHRISTMAS TREE


I created this 'Rosette Christmas Tree' with Christmas themed papers.   The finished tree stands 12 1/2" tall including the star topper and has 14 layers.

I used nine sheets of  12"x 12" cardstock.  I began at the bottom by cutting 3 pieces  4" x 12"  and scoring at 1/2" increments on the 12" side.   Then gluing the 3 pieces together and making a rosette.  I decreased the 4" measurement by 1/4" for each layer as I went up the tree.

...and there you have it.  Thanks for stopping by...


Wednesday, July 28, 2021

EXPLODING BOX


                I was inspired to create my own 'Exploding Box' by using directions drawn up by Penny Wessenauer.  The box measures 4"x 4".  After making the box from black cardstock I cut out panels of patterned paper from an unknown designer.


            Close up of the cluster I created for the top by stacking several layers of a floral die and topping with a butterfly from my stash.  Then I accented with copper colored Prill Beads.


            After removing the lid this is the inside of my box fully extended.


                Close up of my floral cluster in the center of the box.  It was created by again layering a floral die and setting it on top of a pair of rosettes.


            Close up of the Yin Yang symbol of unity that I chose for the four photo folio's. 


                Under the cover is a place for a photo on the bottom and a place for journaling on the top.  Folio is secured with a small magnet.


...and there you have it.  Thanks for stopping by...


Sunday, July 4, 2021

WHIMSICAL 'GARDEN POT'


The base for this 'Garden Pot' is a small pot used for seedlings I got from the nursery.  It measures  2 1/2" wide at the top and  2 1/4" tall.


The flower petals came from clip art on the internet.  I brought one into Photoshop Elements for sizing and coloring.  Big flower is about 2 3/4".


The other embellishments are grass dies from my stash as well as characters from clip art on the internet.  Inside the seed pot is a small Styrofoam ball cut in half to give a sturdy base for the wires that are acting as stems.


This is the back side.  The base for the pot is made of two scalloped circles mounted on chipboard.


                                                ...there you have it.  Thanks for stopping by...


Thursday, June 24, 2021

MILK CARTON TREAT BOX


        I created this 'Milk Carton Treat Box' using regular cardstock.  I was inspired by a tutorial by Sherry,  'The Posh Paper Lady'.  Her tutorial is HERE.  I created the ephemera by using images from clip art on the internet. I brought it into Photoshop Elements for coloring and sizing.


This is the back.  As you can see, designs go all the way around.   Box measures  2 1/2"  x  5 1/2".


Here's a second 'Treat Box'.  Same process.  The grass is a die from 
Honey Bee called 'Grass Border'.  Puppy is from the internet.  Doghouse and some of the ephemera come from a Snickerdoodle Designs kit called 'Puppy Love'.


Here's the back and some of one side.


This is a 'Mini Carton Treat Box'.  Measures about  1" x   2 1/2".


...and there you have it.  Thanks for stopping by...


Tuesday, June 15, 2021

TWIST-n-FOLD POP UP CARD


I created this Twist-n-Fold Pop Up Card using a tutorial from Graphic 45.  You can find that tutorial HERE.   The 'Happy Birthday' sentiment and other ephemra was designed by using the 'Enchanted Trees and Ground Cover' kit by Etsy designer Anne Pinkleton. 


Card measures  11"  x  10"  fully opened..  I used paper from Graphic 45 'French Country Collection' for backgrounds. 


Here's the back.


...and there you have it.  Thanks for stopping by...


Sunday, May 16, 2021

'CELEBRATION GARDEN' BLOCK


            I created this 'Celebration Garden Block' for the 'Anything Goes' competition at The Funkie Junkie Boutique Blog.  If you would like to play along you can find them HERE.

 It measures about 4" x  6" and is 2" deep.  Finished height is about 7".   All the patriotic images came from clip art on the internet.  The flowers are from my stash.  Original designer is unknown.


            I began by cutting up a  2" x  4"  into  6" lengths.  All the edges were painted with white acrylic paint and coated with mod podge for some shine.  The drilled holes are to support the flag and the flowers.  They are mounted on wrapped floral wire.


The sides of the block are covered with papers from a digital kit called '4th July' designed by Little Panda Digitals on Etsy.


Here's the back.  I painted the little wooden balls with red acrylic paint and coated with Mod Podge.


...and there you have it.  Thanks for stopping by...


Friday, April 23, 2021

TRIPLE POP UP CUBE CARD


            I created this Triple Pop Up Cube Card using standard cardstock weight papers.  The background design papers came from browsing the internet looking at tapestry designs.  The flower are from my stash.    The birds are from clip art on the internet.


        I brought everything into Photoshop Elements and attached designs to my templates.  I did burnish all the edges with Distress Ink called Gathered Twigs.  I used a video by Lisa at Queen Bee Creations to get the measurements and directions.  You can find that HERE.

    
                                                                 This is the basic form.

    
                             Then I just started attaching all the templates, flowers and birds.


                                           ...and there you have it.  Thanks for stopping by...


Saturday, March 13, 2021

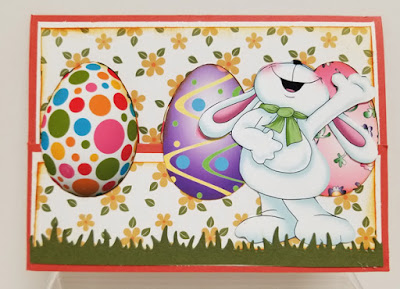
STABLE DOOR CARD


     I designed this Stable Door Card for Easter.  It measures 4" x   6".  Jan, a demonstrator for Stampin' Up has a wonderful video on how to put this card together.  That is HERE. 

     
     I made my own templates in Photoshop Elements for the background papers.  The bunny and the eggs are from clip art on the internet. 


                                                           This is the card opened up.


                           Here's the back.  Grass is a 'Honey Bee' die called 'Grass Border'.


                                          ...and there you have it.  Thanks for stopping by...


Sunday, March 7, 2021

NAUTICAL BOX


I created this 'Nautical Box' as a good place to store cards and envelopes.  It  measures  6"x 6" and is 2" deep.  I used regular  black cardstock.


Making my own templates to fit the different layers, I used papers from a digital kit called 'Mermaid Chronicales' by Royanna.  The ephemeras is also from that kit.  Sea shells are from my stash.


...And there you have it.  Thanks for stopping by...


Tuesday, January 26, 2021

Stationery Gift Box


I created this as a 'Gift Box' to hold stationery or recipe cards. Finished measurements are  6 1/2" x  4 1/2".   Using the measurements by Karon from Karon's Krafty Korner,  I made templates that I covered with papers from my stash.  You can find Karon's instructions HERE.    

Box with the belly band removed.  The Steampunk bear came from clip art on the internet.  I brought it into Photoshop for sizing and coloring.

I designed a set of cards using a digital kit called 'Tickets To Dragons End' by Lorie Davidson at Studio Girls. 

Some are 'Thank You' cards and some are 'Thinking Of You' cards.  Printed on ivory cardstock they fit into  6 1/4" x  4 1/4"  envelopes. 


Side of the Box.  


...And there you have it.  Thanks for stopping by...