Saturday, February 27, 2016

FLOWER POT POCKET CARD


     This Flower Pot Pocket Card measures 6 x 6 1/2 inches.  I used Basic Black card stock by Stampin' Up.  The polka dot base is from a scrap in my 'Stash'.  I used a 'you tube' video by Splitcoast Stampers for the basic directions.


     This is the message insert that slides out the top.  The flowers and lady bugs are from a digital kit called 'Lady Bug Lady Bug' by Karen at Snickerdoodle Designs.  The leaves are from a die called 'Romantic Vines' by Spellbinders.


     Instead of holding the pot together with a ribbon I used  Scor-tape in the top corners.


       I printed a sheet containing all the flowers and lady bugs to be cut out.  The message on the insert  reads 'Spring has sprung' and I left one blank in case I want to stamp a sentiment next time.  I attached red card stock on the back of the insert.  It measured 4 1/2 x 2 1/2.


     The flying lady bugs were made by cutting out two and gluing them together with about two inches of 16 gauge wire in the middle.  These I attached to the message insert under the flowers with hot glue.


  Thanks for stopping by...


Tuesday, January 26, 2016

ACCORDION FILE FOLDER


     This is my Accordion File Folder.  The directions are from Split Coast Stampers.
     I chose the digital kit 'My Heart Lives Here' by Snickerdoodle Designs because of the wonderful Valentine colors and design papers.
      The front is decorated with an assortment of 'Badges' from the kit.  I altered the sizes and attached them with pop-dots.  Also added some pearls and little tattered flowers.  I used the dotted pattern papers in the kit to make the flowers.  


     The first thing I did was measure out the matts for all the sections of the album and covered them with papers from the kit.  The directions did not include this step but I cut them 1/4 inch smaller than the inner pages.  I cut out Front, Back, Insides, Removable Tags and Bottom Flap matts all at the same time.


       After folding the Album I burnished the edges with 'Aged Mahogany' Distress Ink.  As I burnished the edges of the various matts I started adhering them together with double sided tape.


     This is the extended shape of the Album showing the removable tags.  I also attached some of the 'Badges' along the bottom flaps.


     Close up of a bottom flap.  Background is from kit as well as the 'Cluster' in the middle.


     Close up of the tags.  I used the 'Boarders' and 'Sentiments' from the kit.


     And to complete it all is the back of the Album.  Finished size is 4 1/2 x 7 3/4 inches.


                                                              Thanks for stopping by...


Friday, January 15, 2016

3D VALENTINE CARDS


     I'm still finding things to do with those 'Whimsical Birds' from the 'Today' digital kit at Snickerdoodle Designs.  Here they are in a nest of flowers.  I made the flowers using a Tim Holtz die called 'Tiny Tattered Florals' and hot glued them in place.  
     The card measures 2 1/2 inches x 3 1/2 inches.


     I did my cutting out of the characters all at the same time.  Cutting two of each one,  I glued them back to back over a piece of wire and stuck them in styrofoam to dry.


     I burnished the edges of the chip board with 'Fired Brick' from Distress Ink.  The birds and other characters were coated with 'Glossy Accents' and left to dry over night.  The longest piece of wire measures about 3 inches.


                                        There is a top and bottom image that I attached with double sided tape  onto the chip board.


                                     Here's the finished cards all ready to be delivered.


                                                        Thanks for stopping by!


Sunday, December 13, 2015

CHRISTMAS THANK YOU CARD


     Here's a Thank You card for all the great stuff I've gotten for the Holidays.  It measures 5.5 in. by 8.5 in. to fit in the A2 size envelopes.  I'll send the little 'Snow People' along with each card.
     I used 'Trimming The Tree' digital kit by Karen at Snickerdoodle Designs.  It will be in her store on the 17th of December.


                                                                  This is the front.


                                            This is an insert on the inside with sentiment.


     I love to fussy cut.  To make the Snow People I used the quick selection tool to extract the snowman from front of card.  


     When I printed the card itself I used the extra space around it to print the 'Snow People'.  So that they can be free standing I flipped one of each pair horizontally.


     Using a clear gel tacky glue I glued the two sides together.  I put clips around the edges to hold them down while drying.  The wire is 16 gauge.  I bent a 3 in. piece in half and inserted it between layers.


     They stand up very well and will lay nice and flat inside the cards.  I think they look very excited about the journeys they are about to make!

                                                             Merry Christmas! 

                                                          Thanks for stopping by...


Saturday, October 17, 2015

WINE BOTTLE NIGHT LIGHT


This glass wine bottle measures about 15 inches high.  There is a hole drilled in the back to insert  mini string of clear lights.  Grape cluster is formed by 1/2 inch glass beads glued on with Shoe Goo. 


Neck and top of bottle is decorated with paper flowers made with 'Tiny Tattered Floral' die by Tim Holtz.  The little bird topping off the cork is from the digital kit 'Today' by Karen at Snickerdoodle Designs.  You can get that HERE. 


Thanks for stopping by...


Sunday, October 11, 2015

WHIMSICAL BIRDS


These 'Whimsical Birds' are from a digital mini kit by Snickerdoodle Designs called 'Today'.  You can get the kit at her store HERE. 


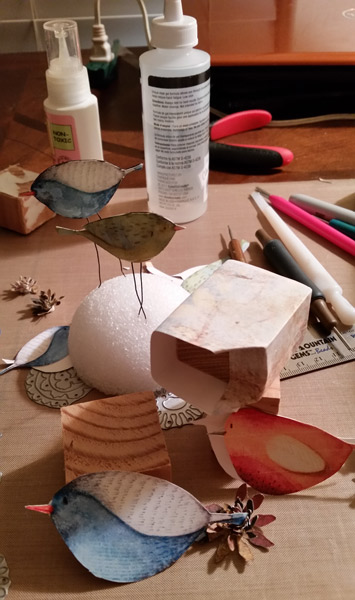
I started by bringing  each bird into Photoshop to make three different sizes.  Each bird had to be flipped before printing so I could glue them together.  The legs are made of 14 gauge wire.  The background pages match the birds perfectly.  I printed some for covering the blocks and some for the flowers.


After the glue dried I coated them with 3D Crystal Lacquer to give them a shiny look.  Then covered the wood blocks and burnished the edges with Distress Ink.

The blocks measure 1' by 1 1/2'.  The flowers are made from 'Tiny Tattered Florals' die by Tim Holtz.


Thanks for stopping by...


Wednesday, October 7, 2015

'STEAMPUNK' Book End


I only need one bookend for my desk.  The base is made of blocks of wood wrapped with paper.  It's job is to hold my books and calenders up against my printer.


I started by gathering a basic metal bookend and different sizes of wood blocks.  The papers are from a Tim Holtz  'Steampunk' paper pack.  Bookend  measures 7x9.


Here's a side view.  It measures 4 inches wide.  I used  Tim Holtz's 'Tattered Florals' die for the roses and his 'Tiny Tattered Florals' for the smaller flowers.  All the other findings and do-dads came out of my stash.


Thanks for stopping by...